Classification
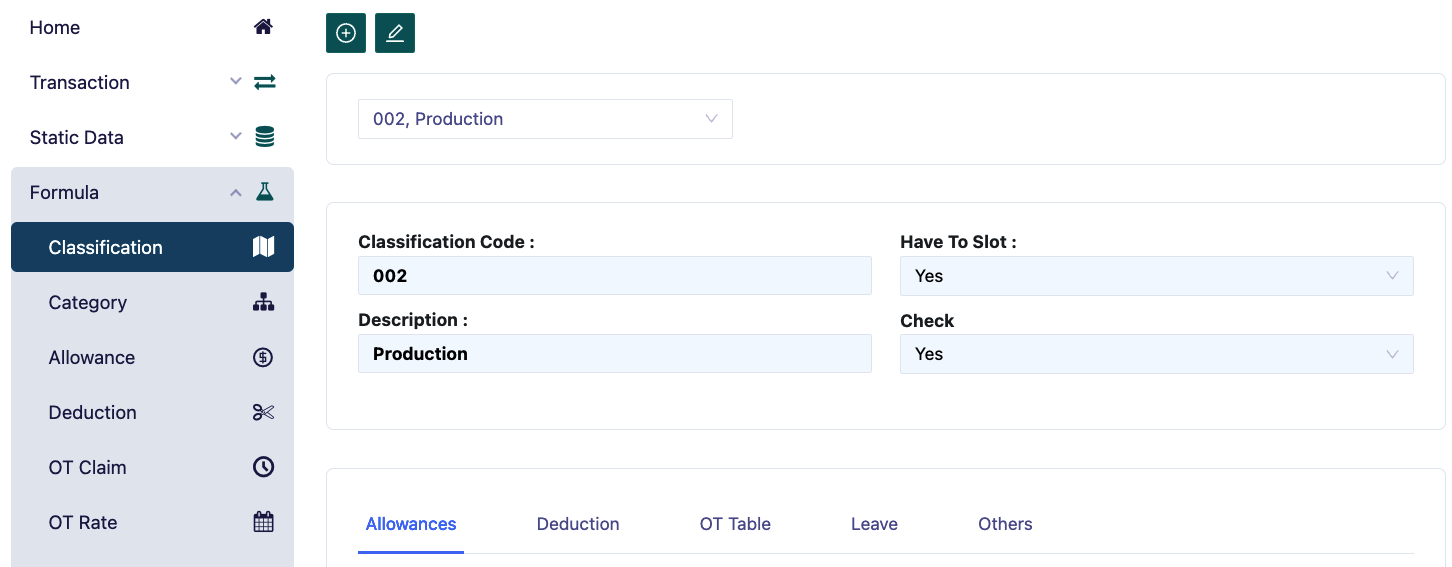
This menu is used for entering initial data regarding salary, deductions, overtime hours, and employee leave. In this menu, you must enter formulas that are adjusted to the company's regulations.
To add a new classification, press the [+] button in the top left corner.
In this classification menu, we input data for the work rules at each company level or grade. For example, in a company, there may be a distinction between Staff and Non-Staff, where their attendance rules are also differentiated, so the formulas entered will significantly impact the attendance calculation.
The steps required to enter classification data are as follows:
- Allowances
- Deductions
- OT Table
- Leave
- Others
- Member
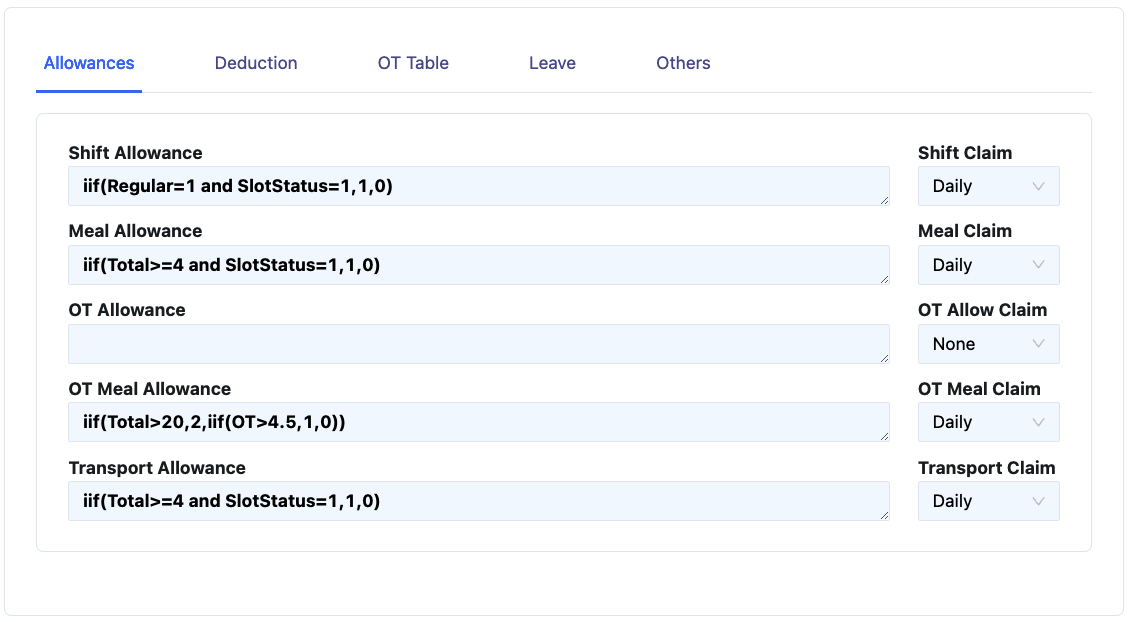
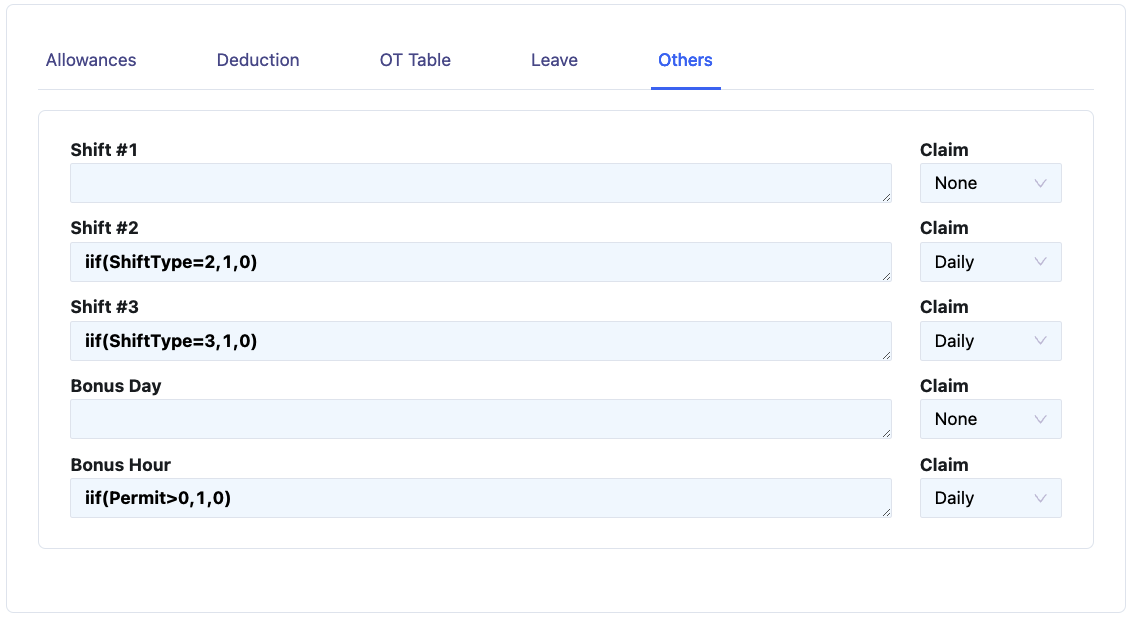
- In the shift allowance field, type the formula for calculating shift allowance, for example, iif(ShiftType=3 and Total>8,1,0). The logic of this formula is: if the shift is the third or night shift and the total working hours exceed 8 hours, the allowance will be 1, otherwise = 0.
- In the Claim field, select 'Daily' if the claim calculation is processed per day. Select 'None' if there is no Shift claim.
- In the meal allowance field, type the formula for calculating meal allowance, for example, iif(Regular=True,iif(Total>Normal,1,0)). The logic is that if it's a regular working day (Regular=True), and if the total working hours or actual hours match the normal working hours, the meal allowance will be 1, otherwise zero (0).
- In the meal claim field, select 'Daily' if the claim calculation is processed per day, select 'None' if no claim calculation, and select 'Monthly' if the claim calculation is processed monthly.
- In the OT allowance field, type the formula for calculating OT allowance. For example: iif(OT>=1,1,0), meaning that if overtime is equal to or greater than 1 hour, the OT allowance will be 1, otherwise zero (0).
- In the OT meal allowance field, type the formula for calculating OT meal allowance. Example: iif(OT>=5,1,0). The logic is that if OT is equal to or greater than 5, the OT meal allowance will be 1, otherwise zero (0).
- In the transport allowance field, type the formula for calculating transport allowance. Example: iif(Regular=True,iif(Total=Normal,1,0)). The logic is that if it’s a regular working day (Regular=True), and if total working hours are equal to normal working hours, the transport allowance will be 1, otherwise zero (0).
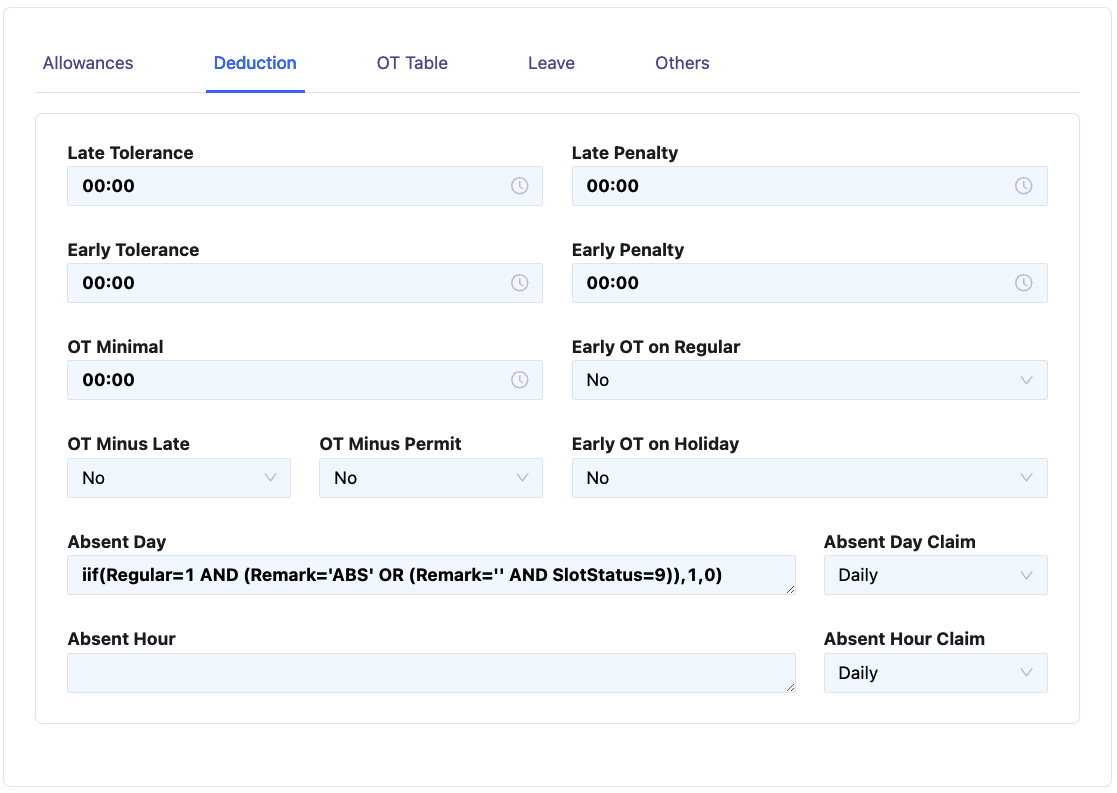
- In the Late Tolerance field, type the minimum late time tolerance, for example, type 00:15, so a lateness < 15 minutes will not incur a deduction.
- In the Early Tolerance field, type the early departure time tolerance, for example, type 00:05, so leaving 5 minutes early will not incur a deduction.
- In the OT minimal field, type the minimum overtime time. For example, type 01:00 to set the first minimum overtime hour to 1 hour; if less than one hour, overtime will not be calculated.
- In the Late Penalty field, type the penalty for lateness, for example, type 00:15. Late penalties will be applied in increments of 15 minutes: late 00:01 ~ 00:15 will incur a 15-minute penalty, 00:16 ~ 00:30 incurs a 30-minute penalty, and so on.
- In the Early Penalty field, type the penalty for early departure, for example, type 00:15. Early departure penalties will be applied in 15-minute increments: early 00:01 ~ 00:15 incurs a 15-minute penalty, 00:16 ~ 00:30 incurs a 30-minute penalty, and so on.
- In the Absent Day field, type the formula for calculating absent days. Example: iif(Remark=’AB’,1,0). The logic is that if Remark=AB, 1 will appear in the AbsentDay column in Attendance Maintenance; otherwise, zero (0). The Remark field needs to be filled in attendance maintenance if an employee is absent and is marked as AB.
- In the Absent Day Claim field, select 'None' if no claim for absent days is calculated, select 'Daily' if the claim is calculated daily.
- In the Absent Hour field, type the formula for calculating absent hours, for both lateness and early departure.
- In the Absent Hour Claim field, select 'None' if no absent hour claim is calculated, select 'Daily' if calculated per day.
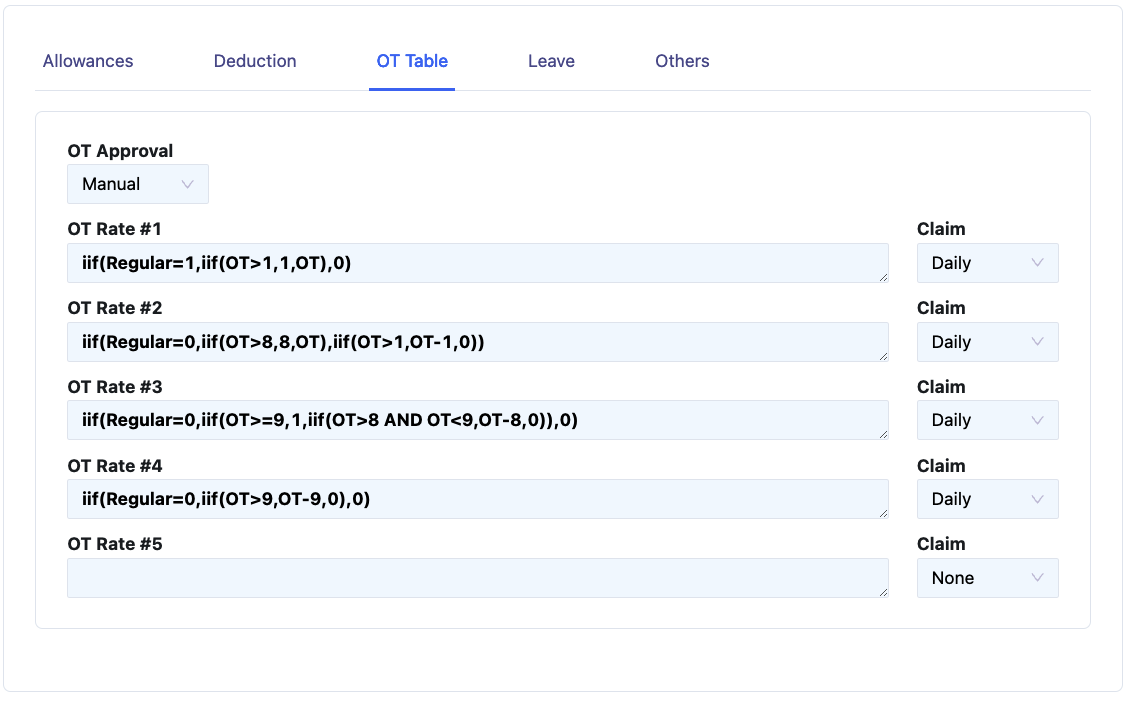
- In the OT Approval field, select 'None' if there is no overtime approval, select 'Manual' if overtime approval is done manually. The OT calculation will appear if the user manually selects 'Yes' in attendance entry and will remain 'No' if not changed, meaning OT will not be calculated. Select 'Automatic' if OT approval is done automatically (OT will automatically be calculated as approval is automatically 'Yes' in attendance entry).
- In the Early OT field, select Yes if early attendance (before the start of working hours) will be calculated as OT, select No if not.
- In the OT Rate 1 field, type the formula for calculating OT Rate 1. Example: iif(Regular=True,iif(OT>1,1,OT)), the logic is that for regular working days, if OT exceeds 1 hour, OT Rate #1 will take 1 hour, if OT is less than 1 hour, all OT is taken as OT Rate #1.
- In the Claim OT Rate 1 field, select 'None' if there is no claim for OT Rate 1, select 'Daily' if the claim is calculated daily.
- In the OT Rate 2 field, type the formula for calculating OT Rate 2. Example: iif(Regular=False, iif(OT>7,7,OT), iif(OT>7,6,iif(OT>1 AND OT<=7,OT-1,0))), meaning that for holidays, if OT exceeds 7 hours, 7 hours will be taken for OT Rate #2. On regular working days, if OT exceeds 7 hours, 6 hours will be taken for OT Rate #2.
- In the Claim OT Rate 2 field, select 'None' if no claim is calculated, select 'Daily' if calculated per day.
- In the OT Rate 3 field, type the formula for OT Rate 3. Example: iif(OT>7 AND OT<=8,OT-7,iif(OT>8,1,0)), meaning that if OT exceeds 7 hours but is less than or equal to 8 hours, OT minus 7 is for OT Rate #3.
- In the Claim OT Rate 3 field, select 'None' if no claim for OT Rate 3 is calculated, select 'Daily' for daily calculations.
- In the OT Rate 4 field, type the formula for OT Rate 4. Example: iif(OT>8,OT-8,0), meaning that if OT exceeds 8 hours, OT minus 8 is for OT Rate #4.
- In the Claim OT Rate 4 field, select 'None' if no claim is calculated, select 'Daily' for daily calculations.
- In the OT Rate 5 field, type the formula for OT Rate 5.
- In the Claim OT Rate 5 field, select 'None' if no claim is calculated, select 'Daily' for daily calculations.
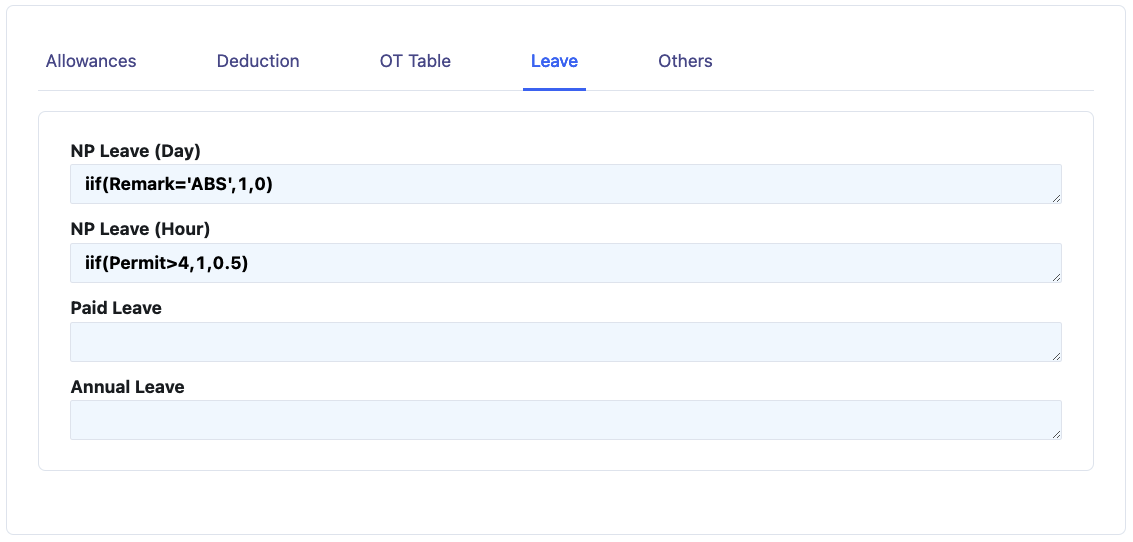
- In the NP Leave (Day) field, type the formula for calculating NPL Day (No Pay Leave Day) or unpaid leave, Example: iif(Remark=NPL,1,0), logically if you select Remark NPL in attendance maintenance, one will appear in the NP Leave (Day) column which means that on the day where the NPL appears one, the employee takes one NPL on that day, to determine that the remark for No Paid Leave (Day) is NPL, the NPL code must first be filled in the remark menu. \ n + In the NP Leave (Hour) field, type the formula for calculating NPL Hour or Permit, Example: iif(Remark=’LA’ OR Remark=’EL’,1,0). Logically, if you select Remark LA or remark EL in attendance maintenance, the Late or Early amount will appear in the NP Leave (Hour) column, which means that on the day where LA or EL appears the Late or Early amount, employee attendance data is Late or Early on that day, to determine that the remark for No Paid Leave (Hour) is LA (for Lateness) and El (for Earlyness), the LA code and EL code must first be filled in the remark menu. \ n + In the Paid Leave field, type the formula for calculating Paid Leave or paid leave such as MC, Marriage Leave, Condolence Leave, etc. Example: iif(remark=’MC’ OR Remark=’ML’ OR remark=’CL’,1,0) Logically, if you select Remark MC (Medical Certificate) or remark ML (Marital Leave) or remark=CL (Condolence Leave) in attendance maintenance, then one will appear in the Paid Leave column, which means that on the day when MC or ML or CL appears one, the employee takes one MC or ML or CL on that day, to determine that the remark for Paid Leave is MC or ML or CL, the MC, ML, and CL codes must first be filled in the remark menu.
- In the Annual Leave field, type the formula for calculating Annual Leave. Example: iif(remark=’AL’,1,0) Logically, if you select Remark AL (Annual Leave) in attendance maintenance, then one will appear in the Annual Leave column, which means that on the day when AL appears one, the employee takes one AL on that day, to determine that the remark for Annual Leave is AL, the AL code must first be filled in the remark menu.
- Note: The codes used in this Leave formula are linked to the codes created in Remark
This menu is provided to maintain the possibility of additional new formulas.
In the Category form, we will enter category data. Category data is used to group employees based on the same type of payment such as: Allowance, deduction, overtime claim, overtime rate, payment method, insurance or tax.
To add a new Category, press the [+] button in the upper left corner of the form. fill in according to the column.
Filling in the Set Up menu is as follows:
- In the Category ID field, type the code for the category to be filled in, Example: 001, 002 etc.
- In the Description field, type the name of the category to be filled in, Example: Operator 1, Operator 2, Staff, Manager etc.
- In the Salary Limit field, type the salary limit to be entered in the category.
- In the OT Base Rate field, select the OT Rate to be used in the category. The OT Rate Base option will appear according to what we fill in in the OT Rate menu. For further information, see the OT rate sub-chapter.
- In the OT Claim Rate field, select the OT Claim to be used in the category. The OT claim option will appear according to what we fill in the OT Claim menu. For further information, see the OT claim sub-chapter.
- In the Assurance field, select Yes, if the employee in the category is participating in the Jamsostek program. Select No, if the employee in the category is not participating in the Jamsostek program.
- In the Paid field, select the Paid that will be used in the category. The Paid option will appear according to what we fill in the Paid menu. Select Monthly, if the employee's salary in the category is monthly. Select Daily, if the employee's salary in the category is daily. Select Hourly, if the employee's salary in the category is hourly. For further information, see the Paid sub-chapter.
- In the Tax field, select the type of tax payment that will be used in the category. Select Employee, if the tax is borne by the employee. Select Company, if the tax is paid by the company. Select None, if the employee for the category is not taxed.
- In the Tax Regulation field, select the type of tax that will be paid for the category. Select Income Tax Article 21, if the employee in that category is subject to Income Tax Article 21. Select Income Tax Article 26, if the employee in that category is subject to Income Tax Article 26.
- In the Tax Yearly Regulation field, fill in what formula the End of Year Tax Calculation will use, just choose it.
- In the Allowances column, select the type of allowance that will be received by the employee in that category. The type of allowance that appears is the result of filling in the allowance in the Allowance menu.
- In the Deduction column, select the type of deductions that will be received by the employee in that category. The type of deduction that appears is the result of filling in the deductions in the Deduction menu.
In the Assurance column we will enter the formulas for calculating Jamsostek, here are the meanings of some of the existing abbreviations.
- Gross assure means a number of figures that will be used as the basis for calculating Jamsostek, for example Base or basic salary.
- Gross assure means a number of figures that will be used as the basis for calculating Jamsostek, for example Base or basic salary.
- Gross assure means a number that will be used as the basis for calculating social security, for example Base or basic salary.
- JHT means Old Age Security, where JHT is divided into 2, namely those borne by Employees and those borne by the Company.
- JKK means Work Accident Insurance.
- JKM means Death Insurance.
- JPK means Health Care Insurance, where JPK is divided into 2, namely those borne by Employees and those borne by the Company.
- In the Gross assure Column: then enter the formula that will be used for calculating social security, for example; Base or basic salary, if the calculation of social security uses basic salary plus some Allowance, then the formula for Gross assure is: Base + AssComponent.
- In the JHT Employee field, type the formula for JHT 2% which will be borne by the employee. Example: GrossAssure * 0.02.
- In the JHT Company field, type the formula for JHT 3.7% which will be borne by the company. Example: GrossAssure * 0.037.
- In the JKK field, type the formula for JKK. Example: GrossAssure*0.0089.
- In the JKM field, type the formula for JKM. Example: GrossAssure*0.003.
- In the JPK field, not all companies use JPK facilities from Jamsostek, because they may use other Health Providers, if using BPJS then type the formula for BPJS. Example: iif(GrossAssure>4725000,4725000,GrossAssure)*0.04.
- In the Check field, select Yes to indicate that the formula we just typed has been checked. If the check option is still No, the payroll posting process cannot be carried out.